The method
The loaf recipe tells you what to do. This page explains why, so that when the dough does something unexpected you can work out what it wants. Read it once, then ignore it.
This follows the method I was taught in a beginners' sourdough workshop, written up here in my own words. Credits are on the contact page.
Tools
Two of these matter and the rest are convenience.
| Tool | Verdict |
|---|---|
| Digital scale, in grams | Essential. Without it nothing is repeatable, so nothing is improvable. |
| Covered pot (cast iron, 4-5 l) | Essential. The lid traps steam, and steam is what gives you a crisp crust and a good rise. |
| Bench scraper | Transforms handling sticky dough. Cheap. Get one. |
| Banneton or basket | Holds the shape during the final proof. A bowl lined with a well-floured tea towel does the same job. |
| Lame, or a bare razor blade | For scoring. A very sharp thin knife will do, especially on cold dough. |
| Probe thermometer | Optional at first, then surprisingly useful - for dough temperature and for knowing when the loaf is baked. |
| Wire rack, serrated bread knife | For cooling and slicing. A blunt knife will crush the crumb you worked for. |
Ingredients
- Flour. Unbleached bread flour, or unbleached plain flour with at least 11.5 % protein. Wholemeal, rye and spelt all work and all ferment faster.
- Water. Filtered, or tap water left uncovered overnight if yours is heavily chlorinated.
- Salt. Fine sea salt.
- Starter, fed and at its peak.
Mixing
Whisk the starter into the water first, until the water turns milky and the starter has dispersed. Then add flour and salt and work it together for 3 to 5 minutes until there are no dry patches left. It will be shaggy, lumpy and stuck to your fingers. That is what it is supposed to look like; it smooths out over the next few hours.
Give the jar a fresh feed at this point too, while you are thinking about it. You have just taken most of your starter out of it.
Stretch and folds
This is how you build strength without kneading. With damp fingers, take hold of one side of the dough, stretch it upwards until it resists, and fold it over the middle. Turn the bowl a quarter turn and repeat, four times in all. That is one set.
- First set about 30 minutes after mixing.
- Then 2 more sets, 30 minutes apart. Three sets in total.
- Wetter dough can take the sets closer together, 15 to 30 minutes. Stiffer dough needs longer to relax, up to an hour.
You will feel the dough tighten as you go round, usually by the third or fourth fold of a set. Over the three sets it changes from flat and dense to plump and jiggly. That change is the whole point.
After the last fold, gather the dough into a neat ball with the sides tucked under, so it rises as one mass rather than lopsidedly.
Bulk fermentation
The long rise after mixing and before shaping. It is where most of the gas, most of the flavour and most of the structure come from. Rush it and you get a tight, bland crumb.
Keep the bowl covered so a skin cannot form. Roughly 7 to 8 hours at 24-26 °C, but temperature changes everything, so go by how much the dough has grown rather than by the clock:
| Dough temperature | Look for a rise of about |
|---|---|
| 21 °C / 70 °F | 75 % |
| 24 °C / 75 °F | 50 % |
| 25 °C / 77 °F | 40 % |
| 27 °C / 80 °F | 30 % |
Warm dough carries on fermenting hard through shaping and well into the fridge - it can take ten hours to actually reach fridge temperature - so you stop bulk earlier to leave room for it. That is why some recipes say "double in size" and others say far less: they assume different kitchens.
It is done when the dough is smooth, domed at the edges where it meets the bowl, puffy, and jiggles when you shake the container gently. It should feel stretchy rather than sticky.
Pre-shaping
Turn the dough out onto a very lightly floured counter and gather it into a loose round. Use a bench scraper against the counter to drag the ball towards you a few times, which tightens the surface. Then leave it uncovered for 30 minutes.
It will spread and flatten during that rest. That is expected - the gluten is relaxing and reorganising, and the slightly dried surface makes the final shape much easier. You can skip pre-shaping on a stiffer dough, but the loaf will be better if you do not.
Final shaping
Flip the dough over, fold the edges into the centre, then turn it seam side down and drag it towards you in a circular motion until the surface feels taut. Dust the top with flour and place it seam side up in a floured banneton.
What you are building is surface tension: a tight skin that makes the loaf rise upwards in the oven instead of spreading sideways. Without it you get something flat, closer to focaccia.
- Use enough flour that it does not stick and tear, then brush the excess away.
- Damp hands help with wet dough. Flour helps with the counter. Use both.
- Be gentle. Squeezing the dough drives out the gas you have spent all day making.
- Round loaf is a boule, long one is a bâtard. Nothing else changes.
Proofing
The final rest, after shaping and before baking. You have two options and one of them is better.
| Method | Time | Flavour | Scoring | Crust |
|---|---|---|---|---|
| Cold, in the fridge | 8-36 h | more sour | easier | darker, glossier |
| Room temperature | 2-6 h | milder | trickier | paler |
On a narrow screen this table scrolls sideways.
Cold proofing wins on almost every count. It deepens the flavour, firms the dough so it scores cleanly, makes over-proofing much harder, and lets you bake whenever suits you the next day. Bake it straight from the fridge - do not let it come up to room temperature first.
To test a room-temperature proof, press a floured finger into the dough:
- Springs straight back and fills in - under-proofed, wait.
- Fills in slowly and not completely - ready.
- Stays dented - over-proofed. Bake it now, accept a flatter loaf.
Scoring
Scoring is not decoration. Gas and steam expand hard in the first minutes of baking, and if the crust sets before they have a way out, the loaf tears open wherever it happens to be weakest. A cut gives the pressure somewhere to go, which is why a scored loaf opens evenly and an unscored one bursts at a seam.
- Score cold dough, straight out of the fridge. Firm dough cuts cleanly.
- Depth roughly 5-10 mm. Enough to break the surface, not to split the loaf.
- Angle about 30-45° to the surface for a lifted "ear"; straight down for a plain slash.
- One swift, committed motion. Hesitation drags and gives ragged edges. Wetting the blade helps.
- Then bake immediately. Dough left sitting after scoring deflates.
A light dusting of flour before cutting makes the score show up. Scissors are good for snipped patterns, bad for long slashes.
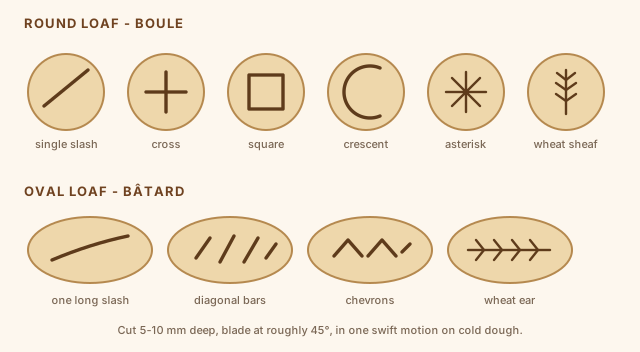
Start with the single slash, slightly off-centre. It gives the best rise and the classic lifted ear, and it is the hardest one to get wrong. The rest are decoration - a loaf with an elaborate wheat sheaf on it tastes precisely the same as one with a line.
Baking
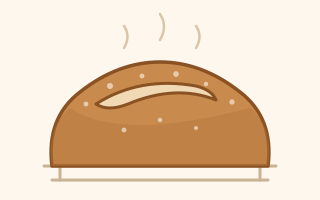
- Put the pot with the lid on into a cold oven and heat to 260 °C / 500 °F for a full 45 to 60 minutes. The pot needs to be genuinely hot, not just the air.
- Keep the dough in the fridge until the last moment.
- Tip it onto baking parchment, leaving enough paper around it to use as handles. Score.
- Lower it into the hot pot by the parchment, lid on. An ice cube tucked between the parchment and the pot wall adds extra steam, if you like.
- Drop the oven to 230 °C / 450 °F and bake 25 minutes with the lid on.
- Remove the lid and bake a further 20 to 30 minutes until deep golden brown.
- It is done at an internal temperature of 96-99 °C / 205-210 °F.
Bottom burning? Slide a baking tray onto the shelf below the pot, or sit the pot on a layer of uncooked rice. Ear browning too fast? Lay a piece of foil over it.
Cooling
Onto a wire rack, and leave it alone for at least two hours. Four to six is better. The loaf is still finishing on the inside as it cools, and cutting into it early gives you a gummy, claggy crumb and a loaf that stales faster. This is the hardest step in sourdough and there is no way round it.
Storage
Always cool completely first. Warm bread in a bag steams itself soggy and moulds fast.
| Method | Best for |
|---|---|
| Linen bread bag | Everyday. Breathes, keeps the crust crisp. |
| Bread box | 2-3 days on the counter. |
| Beeswax wrap | A day or two, cut side protected. |
| Plastic bag | Softens the crust. Fine if that is what you want, or for freezing. |
To freeze: cool completely, wrap well in foil or plastic, then bag it. Good for 2 months, usable for up to 6. Freeze it sliced and you can take out two pieces at a time.
Stale loaf is not a failed loaf - it is croutons, breadcrumbs, or French toast.
Planning a bake backwards
Pick the morning you want fresh bread, then count back.
| When | What |
|---|---|
| 2 days before mixing | Get the starter out of the fridge. Feed it at least twice so it is bubbly and reliable. |
| Evening before mixing, ~8 pm | Feed 1:5:5 - 20 g starter, 100 g water, 100 g flour - so it peaks overnight. |
| Mixing day, ~8 am | Mix the dough. Rest 30 min, then 3 sets of folds. |
| Mixing day, morning to afternoon | Bulk ferment, about 7 hours at 24-26 °C. |
| Mixing day, ~3 pm | Pre-shape, rest 30 min, final shape, rest 30 min. |
| Mixing day, late afternoon | Into the fridge, covered. |
| Next morning | Heat the pot for an hour, score cold, bake, cool. |
Baking the same day instead? Skip the fridge, proof at room temperature for 1 to 2 hours after shaping, and bake. Milder flavour, trickier scoring.
Now go and make the loaf.